
Dashlane is an absolutely amazing password manager. There are several password managers out there, and Dashlane is one of the best ones you’ll come across. Now that you have chosen Dashlane, you must be wondering how to use Dashlane.
Dashlane is completely secure and offers a number of features that are convenient for password management and general internet browsing. Dashlane is more than just a password manager; it also has a VPN and automatic form filler.
If it’s your first time using Dashlane, then it can be a bit tough to use all these features ideally. In this “how to” guide, we’ll teach you how to use Dashlane on your PC or smartphone.
Getting Started with the Dashlane Password Manager
Here’s how to set up and use Dashlane on your devices. Let’s help you get started:
1. Installation and Configuration
If you’ve already installed Dashlane on your device, then you can move on to the next step. If you haven’t, then click here to download Dashlane. When you go to the link, you’ll be redirected to the Google Chrome browser extension. You’ll have to install the extension before you download the app.
Once the download is complete, run/open the file. Dashlane will automatically start downloading all the necessary files. Dashlane will take a couple of minutes to finish downloading the files.
Once the download is complete, a new sign-in page will appear on your screen. You don’t have to go through any of the installation processes.
If you already have an account, just enter your login details. If you don’t, then click on the “Create an Account” option to set up an account.
Dashlane has a guideline that you can use to create a strong & secure password. The password you’ll be setting is the master password for Dashlane; this is the only password you’ll ever have to remember again.
Dashlane’s master password allows the platform to encrypt and decrypt all your saved passwords. If you’re worried about Dashlane reading all your passwords, they have a zero-knowledge policy. Your passwords won’t be stored on their server or locally on your computer.
2. Importing Your Passwords to Dashlane
Now that you have configured your Dashlane account, the next step is to begin managing your passwords. You will first need to import the passwords saved on your browser to Dashlane. It’s not a very complicated process. Dashlane automatically scans your browser during set-up. All you need to do is select the passwords you want to import.
This is what the password import dashboard looks like:
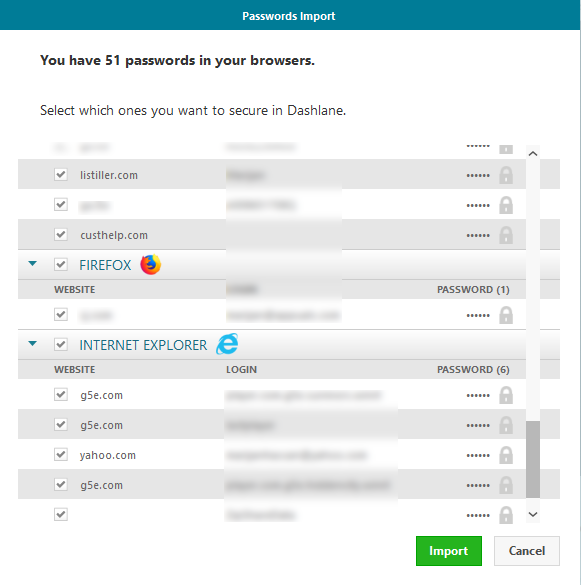
If this doesn’t happen automatically, you can import your passwords manually. How? Well, just go to the file section at the top of the interface and select import passwords.
Dashlane will show you a list of browsers together with a number of other password managers from which you can import your password. Some of the supported password managers include LastPassword, 1Password, and RoboForm.
Moreover, you can import your passwords to Dashlane in a CSV file; this will only work when you have passwords saved locally on your device or if your previous password manager isn’t supported by Dashlane.
You can also manually add each password to Dashlane. Go to the passwords section and click on Add New. Dashlane will then ask you to enter the site URL, username, and password you used to log in to the site.
However, manually adding your passwords is a lot of work. Dashlane offers you a shortcut you can take instead of doing the grunt work. Saving your passwords as you continue using the software. Every time you log into a new website, Dashlane will display a pop-up asking if you want to save the password.
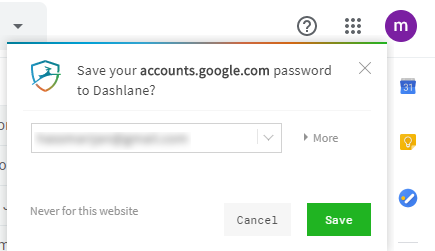
After a while, all your passwords will be saved into your Dashlane vault, allowing you to log in to the sites automatically. This feature only works if you have the browser extension enabled.
3. Enabling the Dashlane Browser Extension
If you’re using Dashlane on your browser, you’ll have to install an extension. Other users will have to activate the extension after they have installed the desktop application. Here are the steps to do it:
- On the top menu of your Dashlane app, click on ‘Extensions.’
- A new drop-down menu will open; from three options, click on ‘Manage Chrome Extension.’
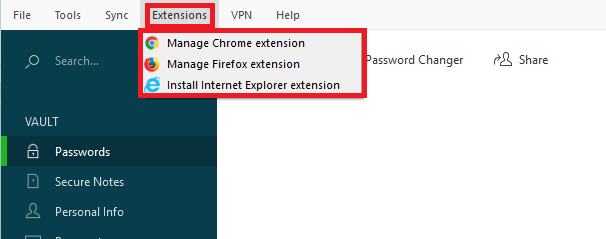
- Click on the browser of your choice and you’ll be redirected to Dashlane’s official website where you can download and add the web extension to your browser.
- Without the browser add-on, you’ll have to copy passwords from the Dashlane app every time you want to log in to the platform.
That’s all! You’ve successfully set up the Dashlane app.
How to Generate New Passwords with Daslane?
Now that you have set up Dashlane, it’s time to use it to secure yourself online. Suppose you’ve been using the same password across all your accounts. In that case, a password manager won’t be able to save you from a security attack. However, Dashlane can make creating solid passwords you don’t remember easier.
You can use Dashlane’s password generator in two ways. First, you can use it while creating a new account when the sign-up process asks you to set a password. You can also use it to change passwords on any of the websites.
To generate a new password, click on the Dashlane icon in the extension bar and click on Generator. Dashlane will instantly whip up a strong password for you to use, so click on Copy and Paste it into the password field.
If the password seems too long and complicated to remember, remember that you don’t have to memorize it. Dashlane will remember all your passwords. And that’s all about storing your passwords on Dashlane.
Summing Up – Use Dashlane to Enhance Security
Dashlane is one of the industry’s best password managers, allowing you to stay safe online. If you’re a Windows user looking to improve your password management, Dashlane is the best option. Not just Windows, Dashlane is also available on other platforms like iOS and Android, so you can also connect your other devices with your account.