Imagine you visit a website, it takes more than 3 seconds to open, how likely are you to stay on the website? 90% of users would leave the website to find an option that loads quicker. As a WordPress website owner, you should always keep website loading speed in mind.
Having a snappy, quick loading is not just for the user experience, it also helps you get an edge in SEO. Fast loading speed is one of many signals that decide your website’s ranking.
As a WordPress website owner, I know how important website loading speed is for achieving great rankings. Let me give you some tips on how to increase your website’s loading speed.
Tips to Improve WordPress Website Loading Speed
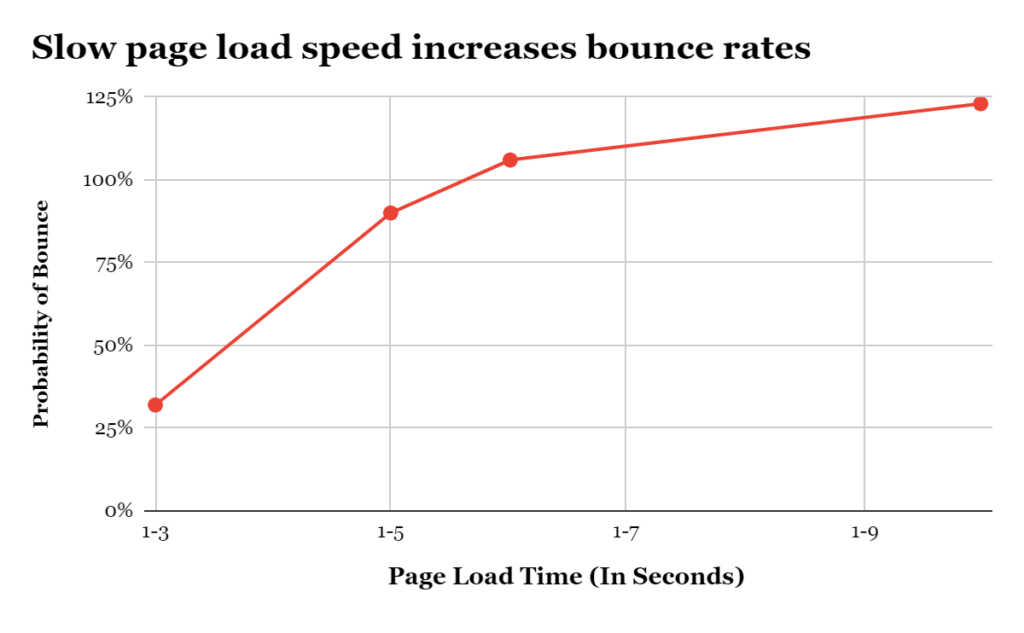
The chart above clearly outlines why it’s important to have good website loading speed. Here’s a simple breakdown of the chart:
| Page Load Time (In Seconds) | Probability of Bounce |
| 1-3 | 32% |
| 1-5 | 90% |
| 1-6 | 106% |
| 1-10 | 123% |
If you’ve recently changed your website’s theme or made changes to the design and since the change you’re seeing a drop in traffic, you should check the loading speed of your website.
When you use a tool to check the page speed, they also offer some recommendations on how to improve its performance. If you’re a developer, you’ll be able to fix most of the issues with ease. If you’re not, don’t worry.
Here are the 5 most common ways to improve page loading speed:
1. Compress Your Images
Large-sized images are one of the biggest culprits if your website is slow. Compress the images on your website to improve page speed and SEO rankings. Compressing an image will also mean the quality of the image won’t be as sharp. If you think you can afford to have ‘not-so-crisp’ looking images on your website, then this is a step you should take today!
You have to find the sweet spot in reducing the size and keeping the quality intact. You don’t want to compress the image so much that a user isn’t able to understand it.
There are thousands of image resizer tools out there that you can use. All of them work essentially the same way:
- Upload your image
- Choose how much you want to compress it
- Resize the image and download it
- Upload the compressed image to your site
If you don’t have the time to resize the images manually, many WordPress plugins can help you out.
Oh, and one more thing. Choose your image file format carefully. Different images may require different image file formats. Some formats are lighter than others. Here are the common formats you can use on your website:
- JPEG: Good for real-world images, photographs, portraits
- PNG: Good format for uploading screenshots, logos, designs, or images with limited details
- GIFs: GIFs slow down your page significantly, so make it a habit of avoiding them.
- WebP: More and more websites have started using the WebP file format because it’s 3 times lighter than JPEG and PNG file formats. It has become the standard for websites that use a lot of images.
2. Reduce HTTP Requests
For your website to load, a browser sends requests to your website’s server. The request (a user wants to view the page) is sent to the server, and the server answers with a file that contains images, text, and multimedia files. A user won’t be able to see the web page until this loop is complete.
Let’s say that request does not contain all the information a user needs to see the page, the browser will then send another request.
The more requests a browser sends to a web server, the more time your website takes to load.
As a WordPress website owner, I try to minimize the number of HTTP requests as much as possible. You can see how many requests a browser (in this case Google Chrome) is sending to load your website.
Here’s how to do so:
- Open your web page on Chrome. Right-click anywhere on the page and click on Inspect.
- You’ll see Google’s developer tools (Chrome DevTools).
- Go to the Network tab.
- When the Network tab opens the panel will have few entries. Reload the page to collect the data.
- Now you’ll see all the HTTP requests, sizes of the request, their size, and the time it takes to load them.
- You can also see the total number of requests in the bottom-left corner.
This is how you can track how many requests the browser is sending to your page. The average page sends about 70 HTTP requests. But that’s not the number you should be aiming for. Each website is different, its requirements are different. Aim for as few requests as possible.
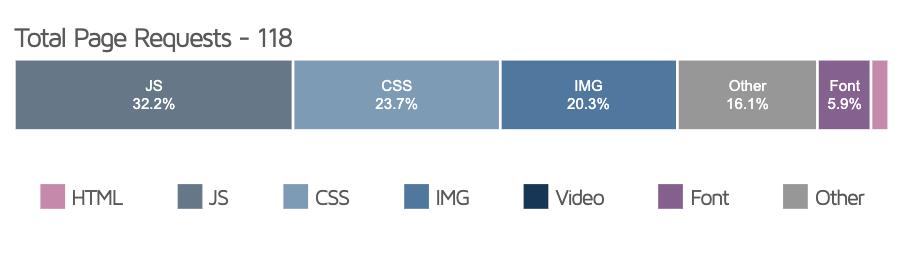
You can use GTmetrix to get a breakdown of how many requests a browser is making for your website. The best part is that it segregates the HTTP requests by type:
3. Minify JS, CSS, and HTML
If you’re to take Google’s John Mueller’s words into account, then minification is worth looking into as it can reduce file size.
It’s pretty easy to minify the code. Start off by removing line breaks, white spaces, or any other element in your code that doesn’t impact the user experience.
Here’s a standard CSS code:
body {
    background-color: #f0f0f0;
    color: #333;
    font-family: Arial, sans-serif;
    line-height: 1.6;
    margin: 0;
    padding: 0;
}

h1 {
    color: #444;
    font-size: 2em;
    margin-bottom: 0.5em;
}

p {
    margin: 1em 0;
}

a {
    color: #0088cc;
    text-decoration: none;
}

a:hover {
    text-decoration: underline;
}

.container {
    width: 80%;
    margin: 0 auto;
    padding: 20px;
    background: #fff;
    border: 1px solid #ddd;
    border-radius: 4px;
}
And here’s what the minified version of the same CSS looks like:
body{background-color:#f0f0f0;color:#333;font-family:Arial,sans-serif;line-height:1.6;margin:0;padding:0}h1{color:#444;font-size:2em;margin-bottom:0.5em}p{margin:1em 0}a{color:#0088cc;text-decoration:none}a:hover{text-decoration:underline}.container{width:80%;margin:0 auto;padding:20px;background:#fff;border:1px solid #ddd;border-radius:4px}
The original version may be easier for developers, but to improve website performance you should be using the minified version of the CSS.
If you want, you can ask ChatGPT to minify your CSS code for you. Or, you can install a WordPress plugin ‘WP Rocket’ to minify the code.
4. Enable Browser Caching
Browser caching is when a browser temporarily saves webpage data. This helps a website load faster the second time the user comes to your website.
Whenever a new user visits your website, their browser stores many elements like images or CSS files. So, whenever the same user returns, the browser doesn’t have to send as many requests.
While this will only impact the experience for returning users, it’s still a thing you should implement in your website. To set up browser caching on your WordPress website, you can use plugins like W3 Total Cache or WP Rocket.
5. Use a Content Delivery Network (CDN)
The purpose of a Content Delivery Network (CDN) is to bring your website closer to the users wherever they may live. Pages load faster for users who are closer to the server where your site is located.
Here’s how a CDN works:
- Cache your site on a CDN
- A user opens your website
- The closest server delivers the site to the user
The best CDNs I would recommend are Cloudflare and Jetpack. Do give them a try, they’re a game changer.